 Three quick tips about seat posts today.
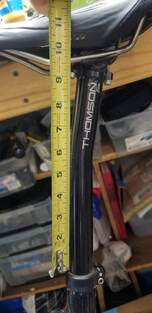
1. After a proper bike fit at a bike shop, mark your seat post height with some tape This can be done very discreetly with some black tape wrapped carefully around the seat post where it meets the collar. The tape can let you know if it has slipped down at all and you can fix it. I've also found it helpful for making a small adjustment when out on the road or trail as you can see how much you moved it. I recommend everyone check out tip two, and if you're against the tape, definitely check out number two. 2. Measure your saddle height from the collar to the rail along one side of the seat post. This obviously only works on the same frame, post, and saddle, but by measuring from the collar to the rail right along the post, you can come pretty close to replicating the measurement should there be a slip. Make sure you always go on the same side of the rail (front or back) and the same place on the rail (top or bottom) This is helpful when you do tip three and want to get your saddle back to the same height. This is also helpful when shipping or flying with your bike. Put this number in your phone and you're good to go. I keep this number along with a little note about the bike, front or back of the post, and to what part of the rail. Just make sure you not which bike is which. As a side note, another good measurement to put your phone is from the center of the bottom bracket (crank bolt) to the top of the saddle. You have to "eye" it across, but you can't get close. This gives you a good starting point when going from bike to bike, renting a bike, or riding a gym bike when your bike isn't available to you. 3. Keep that seat post from seizing in the seat tube! If you've ever dealt with a stuck seat post, you know it can be a nightmare. I had an aluminum post stuck in a steel frame. Thanks to Sheldon Brown and his tip of using ammonia to break that bond, I was able to get it free. But not without a fair amount of consternation. Some materials are more likely to have this occur, but no matter what, addressing this ahead of time is wise. If you're mechanically inclined and have the proper tools including a torque wrench, then probably twice a year I recommend taking your seat post out and cleaning it off if necessary. Then re-apply some sort of product to keep it from developing a chemical bond, which may double as an anti-slip agent. You can research this yourself and talk to your local bike shop. If you ride through a winter mess of wetness and road salt and/or lots of mud and rain, you may need to perform this operation more frequently. Have any tips or questions about seat posts and such? Leave them in the comments below. Keep on riding! Coach Brian
0 Comments
Fueling. Nutrition. Two terms that are thrown around seemingly interchangeably. I'm certainly guilty of this myself. I've written to my athletes about dialing in their ride, race, event nutrition strategy but also about their fueling strategy. For best performance and more importantly, health, it’s perhaps best to consider these two terms independently.
Perhaps cliché, "reframing" how one approaches terms or situation is often very helpful. The podcast that I linked below from Fasttalk certainly helped me to consider these two terms in a different "frame." Within the first few minutes of the listen a light bulb went off. Fueling: what you're eating before, during, and after your workout for performance. Nutrition: what you're eating in general. Some of it will be for performance, but the vast majority of it should be focused on your health and wellness as a human being. And then we talk about "diets." For many, this elicits thoughts of terms like: high-fat, low carbs; the grapefruit diet; keto diet; the Hollywood diet; see food diet (you see food and you eat it); etc. My approach to the word diet, that is perhaps more "scientific", is that your diet is the compilation of all that you eat and drink. Then you may be practicing a specific goal based on ratios of macronutrients (fat, protein, carbohydrates), or eating x amount of specific foods per day, excluding specific foods, etc. This episode of Fasttalk: Find Balance Between Nutrition and Fueling https://www.fasttalklabs.com/fast-talk/find-balance-between-nutrition-and-fueling/ does a great job of clearing up these three terms and providing a framework for a very clean approach. One great concept to consider is that what works well for fueling is not necessarily "healthy." Just because it's athletic food or drink, doesn't mean it's good for you, and may be quite unhealthy when you're not exercising. One area I've modified my diet over the past decade is to not go for that energy bar as my mid-afternoon snack. My favorite go-to was loaded with over 20 (some flavors 30) grams of sugar. Works great as fuel for my long rides, and it's convenient for sure, but not the best snack when off the bike. Instead, now I go for a piece of fruit and maybe some peanut butter on organic corn cakes. Or if I'm in a pinch time-wise, I found some great low or no sugar organic protein bars that aren't loaded with Aspartame but are filled with healthy fats and plant based protein. Even though they're less than 200 calories (and no, I'm not counting calories), it's a very nutritious snack. The result? I find I am satiated and able to hold until my next meal or whole-food snack. I'm not hungry again in 30-60 minutes as I was in the past with foods loaded with simple, or at least not very complex, sugars. Likewise, what's very healthy for you might not be great fueling. I love when Coach Connor comments that a kale salad loaded with vegetables might be very healthy, it's not going to give you good fuel for training or racing. So mix it up, fuel up when you're going to be training or racing. When you're not training that day, your diet may shift quite a bit to focus more on "healthy" eating. In an upcoming post I'll be linking some great nutrition resources that I've come across and shared with my athletes over the years. I find they break it all down and really simplify things. If you have an comment, question, idea for a post, or random thought, please comment below or send me an e-mail. Until then, drink your water and think about what you're putting in your body. Make some small changes, create habits, and then make the next small change. You can do it! Cheers, Coach Brian 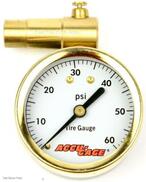 One tip, one tool, and one resource this week.
What's the contact point between your bike and the ground? Tires, of course. I figured I'd stick on this most important topic for one more week. One very simple tip this week, and it's something that almost everyone does unless someone else does it for you: Check your tire pressure. Are you diligent and check it before every ride? Or do you do the old tire squeeze and "yeah, that feels good" that I've been guilty of when in a rush or feeling lazy. To cut to the chase: 1) Check your tire pressure before every ride. Maybe mid ride with extreme elevation or temperature changes. 2) Carry a small pressure gauge with you when traveling without your pump so you're using a reliable tool and not the gauge on an unfamiliar pump. I've used the digital ones, but about 5 years ago I bought three analog types like this one to the right: I bought one that goes to 15 psi, one to 60, and one to 120, for fat bike, 'cross and MTB, and road, respectively. Some gauges don't start reading until 15 psi or even higher, and the little fine tuning button is great. Presta compatible and ready to go. 3) Check out this site: Silca Tire Pressure Calculator https://silca.cc/pages/sppc-form for a cool tire pressure calculator. It will at least give you a great place to start. Remember that with 'cross tires, even 0.5 psi can make a big difference, and mountain bike tires could be 1 psi that really changes your ride. On to my musings... I was installing some new tires on my road wheels that I use for training this past weekend, and it got me thinking back to 2001 when I participated in the Tour of Colorado with three buddies. As a side note, it was one of the most amazing experiences I had on a bicycle. Three days of riding, one rest day where we went rafting on the Colorado River, and then three more days of riding. Huge mountain passes, 60+ MPH descents, and great company. The icing on the cake was that we were raising money for the Lance Armstrong Foundation (whatever you may think of the man, the foundation does some amazing things) and ended up being able to make a sizable donation. There was around 1300 people in the event, and over the course of the days, we were able to chat with many of them. One thing we heard over and over again was about all the flats folks were getting. We also so them on the side of the road making repairs. There was rough pavement, cattle guards, some dirt and gravel sections, and many miles. Between the four of us, we had (knock wood) zero flats. One thing we were very diligent about was checking out tire pressure EVERY SINGLE MORNING. Didn't matter how early or late the roll out, we were hitting the neutral support pump. And there was never a line to get to the pump. Did that save us 100%? Probably not, but it certainly helped to avoid pinch flats over the rough terrain. In those conditions with the extreme elevation changes, the pressure can be drastically effected especially in a low volume road tire. The temperature will impact it too, of course, as well as just slow leakage. I was listening to a podcast where a very experienced mountain biker was doing some epic rides in the mountains with some climbs going up several thousand feet. Before the gnarly descents, he would check tire pressure to set himself up for success. Tire pressure is super important to help keep you rolling, but also improve your ride both for comfort and performance. I'll be doing a post in the near future referencing Leonard Zinn and great information that was certainly eye opening for me. Until then, check that pressure every ride. And go ride! Enjoy, Coach Brian  This week we have another guest post by one of THE most positive athletes I've had the pleasure of coaching, Stewart.
I first met Stewart many years ago at my winter cycling classes. He was always setup in the front row and ready to WORK! I enjoyed chatting with him and his positive energy was contagious to the group. Coming into April of 2019, he reached out to me about structured training with a customized plan designed for him for a big, multi-day event he had coming up that November. As we all know, there are plenty of plans available in cycling magazines, books, and the interwebs. While many of these plans are fundamental sound, they take a considerable amount of guesswork as to where you're fitness level currently sits and also don't account for your other life stressors. Additionally, finding ones that fit into your life's schedule and for your specific event is often impossible. And finally, what do you do if you miss a workout, get sick, feel like the workouts are too easy or two hard, or just want to bounce ideas off an experience coach? I was very excited that Stewart gave me this great opportunity to develop a plan and work collaboratively for his upcoming event, the Hazon Israel Ride, which benefits the Arava Institute and Hazon. Find out more here.. This ride would be 350 miles over 5 days across some amazing terrain. You don't want to travel half way around the world, or even to the next state, and be physically unprepared. He was ready to get after it. Fit is not only fast, it's FUN! Stewart worked smart and hard for those months leading up to the event, giving me great feedback and really listening to his body. We tweaked his plan as necessary, and made it work around his family, job, and other factors in his life. He crushed his ride and it was awesome watching his data and subjective reports come in on a daily basis as I was able to follow his progress from afar. I'm happy to say that I am still working with Stewart and he is still one of the most positive riders out there. Since then, he continues to set PR's, crush centuries, and ride through adversity. He is one of the many amazing people that I have the pleasure of coaching that have certainly helped me get through the pandemic. At the end of 2021, he purchased a power meter and has approached this great tool with an open mind ready to learn. He describes his rides as "gnarly" which is awesome, and has a killer Grateful Dead jersey which is super cool. All right, enough from me. Here's his recap of his epic journey:: Hazon Israel Ride So what's your adventure? Maybe it's a new group ride, a long one day event, riding over challenging terrain, a multi-day journey, or something else. BJL Coaching is ready to design a plan to get your ready for challenge. I also offer personalized training rides for those in the New Jersey area. Have an upcoming adventure, comment, or question? Leave your thoughts below! Go big! Coach Brian 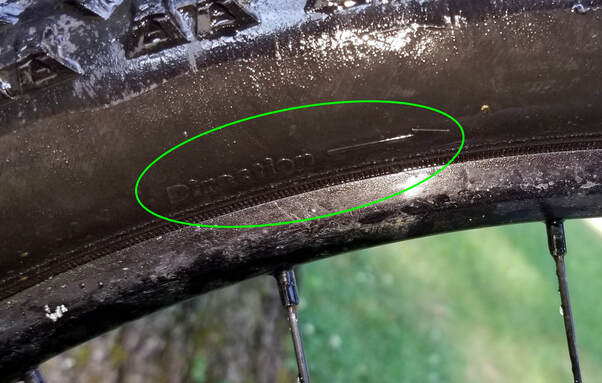 Directional Tires? Which way do they go? Over my many years in the sport, I've gone through countless tires on the road, trails, and 'cross courses. You may have noticed that some tires are "directional", meaning there's a suggested way to mount them so they're facing "forward." Some tires have one direction for the front and the reverse for the rear. I've found that directional tires are more common with mountain bike, 'cross, and gravel tires. Basically tires with more of a knobby tread. Now, you're probably thinking, "duh, just find the directional arrow", shown in the green oval above. Absolutely, and you should probably always confirm. However, finding that word and arrow on the tire is not always easy, and if you're in a hurry or your tire is super dirty, it can be tricky, I've also spotted it, then laid the tire down, and lost it again. It can be a bit of a pain. What I noticed was a real easy way to visually figure out which way the tires go. Tires will often have different printing on each side of the sidewalls. On one side you get the model, etc. (red) and the brand (red). See pic below. 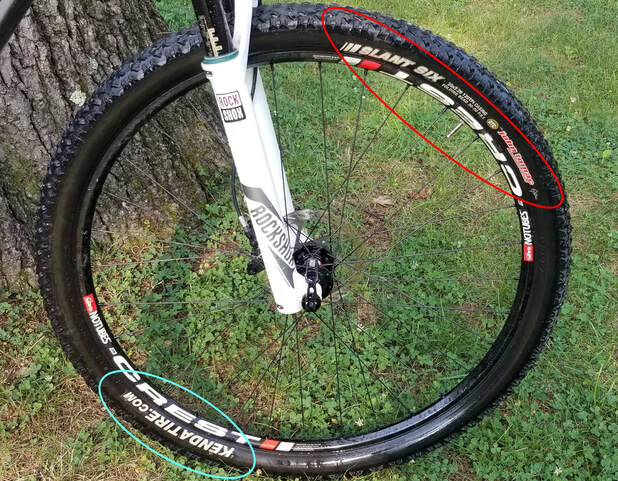 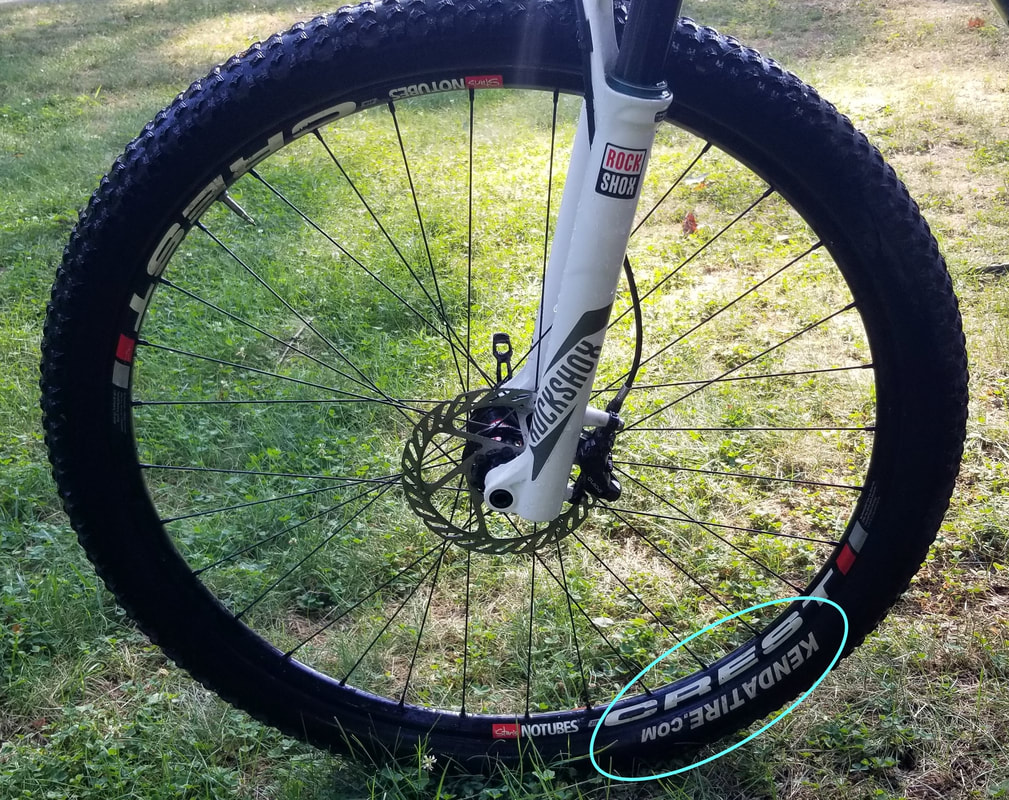 Then on the other side, there is only the brand (blue). See pic above.
I noticed that the correct direction to mount the tire is with the side with the model AND the brand on the drive side of your bike. And, if the model of tire you're running is mounted one direction for the front and the opposite direction for the rear, it's always the front that will have the model and brand on the drive side, and then the rear will have the model and brand on the non-drive side. I know, genius, right? Not quite but can be handy. Side note: I was taught at an early age to always mount my tire with the model label centered on the valve stem. This is very useful if you're running tubes and want to find the associated place on your tire where a puncture occurred (in case there's debris in your tire casing). This also makes it very fast to local the valve stem if you need to quickly add or remove air during a race. Hopefully you get all dialed before the event begins and don't have any issues, but sometimes it happens. One exception is the tire that prints the brand and model on both sides. Then you need to look for that arrow. Sometimes you may choose to run a tire an opposite direction on the rear for "more traction." I've certainly done this, and I believe it does work for some tread patterns. But I've also stopped to think about the fact that these tire engineers are looking to make the best tire possible, so the company would probably suggest that if it were the case? I'm not sure, but don't be afraid to experiment. Just don't experiment for your big event or race. I have yet to find a tire to prove this theory (single printing) wrong, but I'd love to hear about one if you've found it. Or any other tire tips you have. Leave a comment below. Cheers, Coach Brian |
Categories
All
Coach B.L.Coach B.L. is the head coach at BJL Coaching and an avid racer and cycling enthusiast himself. Archives
April 2024
|
 RSS Feed