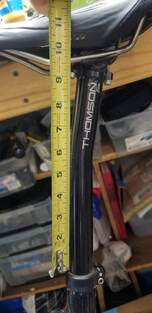
 Three quick tips about seat posts today. 1. After a proper bike fit at a bike shop, mark your seat post height with some tape This can be done very discreetly with some black tape wrapped carefully around the seat post where it meets the collar. The tape can let you know if it has slipped down at all and you can fix it. I've also found it helpful for making a small adjustment when out on the road or trail as you can see how much you moved it. I recommend everyone check out tip two, and if you're against the tape, definitely check out number two. 2. Measure your saddle height from the collar to the rail along one side of the seat post. This obviously only works on the same frame, post, and saddle, but by measuring from the collar to the rail right along the post, you can come pretty close to replicating the measurement should there be a slip. Make sure you always go on the same side of the rail (front or back) and the same place on the rail (top or bottom) This is helpful when you do tip three and want to get your saddle back to the same height. This is also helpful when shipping or flying with your bike. Put this number in your phone and you're good to go. I keep this number along with a little note about the bike, front or back of the post, and to what part of the rail. Just make sure you not which bike is which. As a side note, another good measurement to put your phone is from the center of the bottom bracket (crank bolt) to the top of the saddle. You have to "eye" it across, but you can't get close. This gives you a good starting point when going from bike to bike, renting a bike, or riding a gym bike when your bike isn't available to you. 3. Keep that seat post from seizing in the seat tube! If you've ever dealt with a stuck seat post, you know it can be a nightmare. I had an aluminum post stuck in a steel frame. Thanks to Sheldon Brown and his tip of using ammonia to break that bond, I was able to get it free. But not without a fair amount of consternation. Some materials are more likely to have this occur, but no matter what, addressing this ahead of time is wise. If you're mechanically inclined and have the proper tools including a torque wrench, then probably twice a year I recommend taking your seat post out and cleaning it off if necessary. Then re-apply some sort of product to keep it from developing a chemical bond, which may double as an anti-slip agent. You can research this yourself and talk to your local bike shop. If you ride through a winter mess of wetness and road salt and/or lots of mud and rain, you may need to perform this operation more frequently. Have any tips or questions about seat posts and such? Leave them in the comments below. Keep on riding! Coach Brian
0 Comments
Your comment will be posted after it is approved.
Leave a Reply. |
Categories
All
Coach B.L.Coach B.L. is the head coach at BJL Coaching and an avid racer and cycling enthusiast himself. Archives
July 2024
|

 RSS Feed